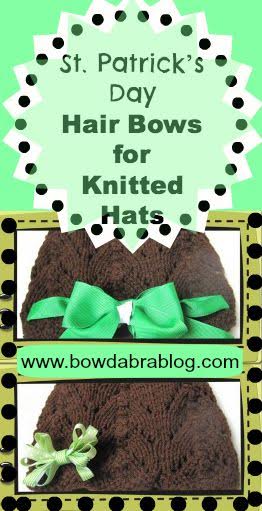
Are you ready to dress in green for St. Patrick’s Day? Make you or your little one a Boutique bow or Loopy bow and attach

Materials for Boutique Bow:
- Mini Bowdabra
- Bowdabra Bow Wire
- Hair Bow Tool & Ruler
- 1.5? Green Grosgrain Ribbon
- 3/8? White Grosgrain Ribbon
- Alligator Clip
- Clear Nail Polish
Instructions:
1. Begin by gathering all the materials you will need for the Boutique Bow. Place the Hair Bow & Ruler on top of the Mini Bowdabra (I used the metric side but there is also an inches side if you would prefer.) Cut a 18” piece of Bowdabra Bow Wire and fold it in half. Place it into the Mini Bowdabra. You’ll have a loop at one end and two loose pieces at the opposite end.

2. Cut the ribbon to desired length. Seal each end of the ribbon with clear nail polish. Fold the ribbon in half to find the center point. Make a crease in the center. Place the ribbon at the crease mark down into the center of the Mini Bowdabra.


3. Grab the very end of one side of the ribbon. I started with the right. Fold the end piece right side down into the center of the Mini Bowdabra. Grab the very end of the other side of the ribbon. Fold over the first ribbon loop and right side down into the center of the Mini Bowdabra. The two ribbons will form an X on the top of the Mini Bowdabra towers.


4. Using the Hair Bow Tool and Ruler as your guide position all four loops evenly and symmetrically. Start with the bottom loop and make a crease in the center and press into the Mini Bowdabra. Then take the top loop and make a crease in the center of it, as well, press into the Mini Bowdabra. Scrunch down the ribbon with the Mini Bowdabra Wand. While the bow is still in the Mini Bowdabra, thread the two loose ends of the Bowdabra Bow Wire through the loop at the other end. Pull the Bowdabra Bow Wire tightly while the bow is still in the Mini Bowdabra.


5. Gently pull the bow out of the Mini Bowdabra. Separate the two loose ends of the Bowdabra Bow Wire and bring them around to the back of the bow and knot.


6. Fluff bow. Use an alligator clip and a finishing knot.

7. Thread some green grosgrain ribbon through the holes of the hat to create additional beauty. I purposely left the ends of the grosgrain ribbon frayed for an extra touch.

8. Attach bow so the knotted center of ribbon using an alligator clip.

Materials for Loopy Bow:
- Mini Bowdabra
- Bowdabra Bow Wire
- Hair Bow Tool & Ruler
- Assorted Morex Bobbin Ribbon
- Alligator Clip
- Clear Nail Polish
Instructions:
1. Create a darling loopy bow for a knit hat, as well. To create the loopy bow I used Morex Bobbin Ribbon. lace the Hair Bow & Ruler on top of the Mini Bowdabra (I used the metric side but there is also an inches side if you would prefer.) Cut a 18” piece of Bowdabra Bow Wire and fold it in half. Place it into the Mini Bowdabra. You’ll have a loop at one end and two loose pieces at the opposite end. Next, place the ribbon in the M
ini Bowdabra and create several loops on each side.

2. I used the Fold & Twist method so the ribbon pattern would be shown. Using the ruler as my guide I continued fold and twist loops back and forth creating multiple loops.

3.Scrunch down the ribbon with the Mini Bowdabra Wand. While the bow is still in the Mini Bowdabra, thread the two loose ends of the Bowdabra Bow Wire through the loop at the other end. Pull the Bowdabra Bow Wire tightly while the bow is still in the Mini Bowdabra.

4. Gently pull the bow out of the Mini Bowdabra. Separate the two loose ends of the Bowdabra Bow Wire and bring them around to the back of the bow and knot.
 copy")
5. Fluff the loops of your bow. Wrap a short piece of Morex ribbon around the middle of the bow.

6. Use Glue Dots or a Glue Gun to attach. Attach an alligator clip for the finishing touch.

7. Clip onto a knitted or regular hat. Instant cuteness!