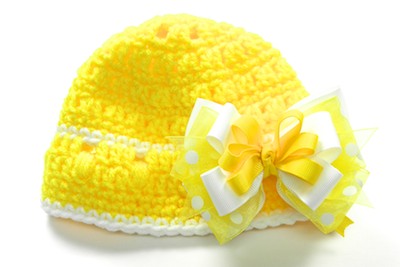
Add a bow to a newborn hat for the ultimate boutique look! Crochet the newborn hat using one of the many free tutorials 
Bow Making Supplies:
- 1.5″ wide White Grosgrain 18″ long
- 1.5″ wide Polka Dot Sheer 18″ long
- 1.5″ wide Polka Dot Sheer 5″ long
- 7/8″wide White Grosgrain 14″ long
- 3/8″ wide Yellow Grosgrain 28″ approximate
- Mini Bowdabra
- Hair Bow Tool & Ruler
- Bowdabra Bow Wire
Instructions:
1. Begin with a crocheted or knit newborn hat.
2. Place the Hair Bow Tool & Ruler onto the Mini Bowdabra. Cut 18″ of Bowdabra Bow Wire, fold the wire in half and place it into the Mini Bowdabra.
3. To make your first boutique bow, cut 18″ of 1.5″ wide white grosgrain. Fold the ribbon in half to create a crease, at the crease mark press it into the Mini Bowdabra.
4. Create the boutique style bow by pressing the ends of the ribbon into the Mini Bowdabra. The ribbon should form an “X”.
5. Press each ribbon strand into the Mini Bowdabra to form your first bow, use the ruler to adjust your loops.
6. Cut 18″ of 1.5″ wide sheer polka dot ribbon. Fold the ribbon in half to create a crease, at the crease mark press the ribbon into the Mini Bowdabra, form your second boutique style bow. Use the Mini Bowdabra Wand to hold the bow down.
7. Cut 5″ of 1.5″ wide sheer polka dotted ribbon. Dovetail the ends of the ribbon and press it into the Mini Bowdabra.
8. Cut 14″ of 7/8″ wide white grosgrain ribbon. Fold the ribbon in half to form a crease. At the crease mark press the ribbon into the Mini Bowdabra. Form your third (smaller) boutique style bow and adjust the loops using the ruler. Continue to use the Mini Bowdabra Wand to hold the ribbon down.
9. You will need approximately 14″ of 3/8″ wide yellow grosgrain, press the end of the ribbon into the Mini Bowdabra, continue to fold a total of six 1″ wide loops. The Mini Bowdabra Wand will need to be used to hold the bow down. Scrunch the bow down with each loop formed.
10. Trim the 3/8″ ribbon from the spool.
11. Keep the wand in place thread the two loose ends of Bowdabra Bow Wire through the loop.
12. Pull the Bowdabra Bow Wire tightly while the bow is still in the Mini Bowdabra.
13. Gently pull the bow out of the Mini Bowdabra. Separate the two loose ends of the Bowdabra Bow Wire and bring them around to the back of the bow. To tie off the bow, pinch the Bowdabra Bow Wire securely against the bow. Twist the bow 4 to 6 times in a clockwise direction.
14. Fluff the bow.
15. Trim away excess wire. Add a finishing knot and a 3/8″ ribbon strand that runs along the back of the bow. The ribbon strand will be used to tie the bow to the hat. This way the only thing that is near the baby’s skin is ribbon.
16. Tie the bow onto the newborn hat, leave the tails hanging behind the bow for easy removal.
