

Using the Mini Bowdabra, sheer ribbon, and clothespins design these adorable fairy ornaments. The ornaments are perfect for anytime of the year but also would look amazing on your holiday Christmas tree.
Materials Needed:
Instructions:
1. First begin by by sanding the clothespins to make sure there are not sharp edges or rough spots.

Clothespin Fairy Ornaments Tutorial
2. Next, add several layers of white acrylic paint. Finish by adding paint to the bottom for boots and paint at the top for a shirt. Make sure each layer is dry before painting the next layer.

Clothespin Fairy Ornaments Tutorial
3. Create wings for the fairies using the Mini Bowdabra and Hair Bow Tool & Ruler. Create 2.5? wings at the top and 2? wings at the bottom.

Clothespin Fairy Ornaments Tutorial
4. Create the tulle tutu –Begin by cutting a piece of 18?Bowdabra Bow Wire and place it into the Mini Bowdabra.

Clothespin Fairy Ornaments Tutorial
5. Scrunch tulle into the Mini Bowdabra in an accordion style.

Clothespin Fairy Ornaments Tutorial
6. Scrunch down with the Mini Bowdabra Wand.

Clothespin Fairy Ornaments Tutorial
7. While the bow is still in the Mini Bowdabra, thread the two loose ends of the Mini Bowdabra Bow Wire through the loop at the other end.

Clothespin Fairy Ornaments Tutorial
8. Pull the Bowdabra Bow Wire tightly while the bow is still in the Mini Bowdabra. Gently pull the bow out of the Mini Bowdabra.

Clothespin Fairy Ornaments Tutorial
9. Separate the two loose ends of the Bowdabra Bow Wire and bring them around to the back of the bow and knot. Attach the tulle tutu to the clothespin. Knot the Bowdabra Bow Wire onto the back of the clothespin and then use the remaining wire as a hanger.

Clothespin Fairy Ornaments Tutorial
10. Attach the wings to fairies by tying the Bowdabra Bow Wire along the back. Bring the wire back to the front and knot it. Add little knots for hands and trim away excess wire.Add a little face to the fairy using markers.

Clothespin Fairy Ornaments Tutorial
11. Add tutus, wings, and faces to all the fairies.
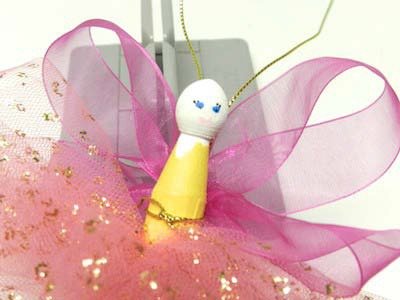
Clothespin Fairy Ornaments Tutorial
12.Make several fairies and hang them in the window, play with them, use them as backpack charms, or hang them on your Christmas tree.

Clothespin Fairy Ornaments Tutorial

Clothespin Fairy Ornaments Tutorial


4 thoughts on “Clothespin Fairy Ornaments Tutorial”