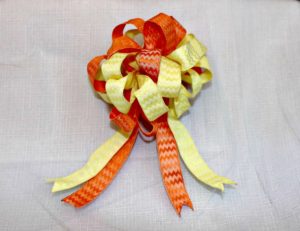
The focus is on fall with this adorable dual color loopy hair bow how-to video. Sandy Sandler makes it so quick and easy with the Mini Bowdabra. The colors of orange and yellow are perfect for the fall season, back to school and more! So elegant, easy and inexpensive that you will want to make several to give away as gifts.
Materials
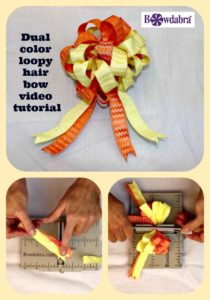
For this project, we’re going to make a loopy hair bow using two different colored ribbons. And I picked this really cute chevron ribbon. So the first thing I’m going to do is take my Mini Bowdabra and I’m going to put my Bowdabra Measuring Tool on top. Then, fold my Bowdabra Bow Wire in half and lay that down into the Mini Bowdabra. And I’m just going to tuck it underneath to keep the wire out of the way.
Then I’m going to have 9 1/2 inches of my ribbon, and the first thing that I’m going to do is fold my ribbon in half. Now, as you can notice, I’ve already dovetailed the ends and sealed them with a lighter. So now I’m going to just scrunch this down into my Bowdabra and leave that just the way it is. Then I’m going to take my ribbon and I’m going to just put both pieces of ribbon into my Bowdabra. Then I’m going to fold, I’m going to make these about 2 inches each. And so I’m just going to fold that in.
Next, I’m going to take my orange and I’m going to measure 2 inches. I’m going to fold that over. And then I’m going to take my yellow and measure 2 inches again. I’m going to twist it. Now you don’t have to twist. I like to twist it because I think it stays better in the Mini Bowdabra. So I’m just going to keep doing this, alternating my colors. So I’m measuring 2 inches, and then I’m going to fold my orange over and twist it. This makes such a colorful spring, summer, Fall, back to school bow. Then I’ll take my yellow and fold that over and twist it. So it’s a great project when you’re getting your back to school wardrobe together.
Basically here I’ve made 10 loops on each side. So you’ve got quite a lot of ribbon in this bow. And I’m just going to fold and twist my last one. Twist that and do one more here. I think I’m just going to leave that there.
That’s enough. I’m going to take my wand and I’m going to scrunch everything down nice and tight. Then I’ll take my wire while it’s still in the Bowdabra. I’m going to put it through my slipknot and hold the bow really tight and pull that wire very, very tight, separate my ends, bring it around to the back and then kind of twist this a little bit so that the wire can be quite tight in the back when I tie my knot.
So I’ll tie it off here and tie a knot. Now you can tie this onto your clip or onto a ponytail holder. So we’re just going to fluff it out. Just continue fluffing so you have all of your pretty loops. Also this ribbon is a wired ribbon, which makes it much easier to fluff, but you can use any kind of ribbon. And then I have my tails, just pull my tails down here. And when you’re finished fluffing, you have an absolutely adorable little hair bow.