Who doesn’t like receiving a greeting card? Why not make a hand made card for Memorial Day? It’s easy with Bowdabra and when you add a Bowdabra bow it’s even more special! Follow this quick and easy tutorial to add a beautiful bow to this Memorial Day card. Don’t stop here, though, make cute and perfect Bowdabra bows for all you greeting cards!
Celebrate those who gave their lives and are fighting for our freedom with a handmade card for Memorial Day.


Card for Memorial Day
Materials:
- Designer paper
- Stamped image
- Cardstock
- 5/8” satin ribbon
- Star brads or embellishment
- Mini Bowdabra with hair bow tool and ruler attachment
- Bowdabra bow wire
- Double sided tape
- ½” glue dots
Instructions:
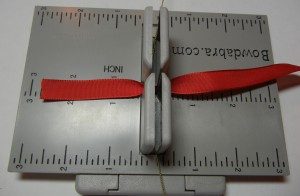
- Create the card, then make the bow. Begin by placing the Hair Bow Tool & Ruler onto the Mini Bowdabra. Cut 18”³ of Bowdabra Bow Wire and place it into the Mini Bowdabra.


Make your bow
- Place your satin ribbon into the Mini Bowdabra with the tail on the left at the 2 1/2″ mark and the wrong side of the ribbon facing towards you.

- Fold the ribbon on the right side at the 1 1/4″ mark and take it over to the left side. As you do this, twist the ribbon in the center so that the shiny/right side of the ribbon is facing up on the right side, and the wrong side of the ribbon is facing up on the left side.


- Fold the ribbon on the left at the 1 1/4″ mark and take it back through the Bowdabra to the right side of the Bowdabra again twisting the ribbon in the middle so that the shiny right side is facing up on the left and the wrong side is facing up on the right.


- Continue to fold the ribbon at the 1 1/4″ mark and take it back over to the other side always remembering to twist the ribbon in the middle so that the shiny/right side is facing up on the right side. And the wrong side of the ribbon should be facing up on the left side.


- Notice that my loops are a little off kilter so that when the bow is finished, the loops will spread out some and not just lay flat on top of each other.


- Now that we have 2 loops on either side of the Mini Bowdabra, it’s time to finish it off. Take your wand and scrunch down the ribbons.


- Remove the wand and gently pull up the ends of the Bowdabra Wire and using the Wire, tie a knot on the back of the bow.

Finishing your bow
- Gently remove the bow from the Mini Bowdabra and carefully trim the ends of the wires and ribbon tails.


- To finish off your bow, take a 1/2″ glue dot and scrunch it together a bit so that it fits over the ends of the Bowdabra Wire on the back of your bow.

- Take the end of the spool of ribbon and place it over the glue dot on the back of your bow. Add another 1/2″ glue dot and scrunch it up a little. Now, place it over the end of the ribbon on the back of your bow. Take the long end of the ribbon and wrap it around the middle of your bow scrunching it up a little as you do so you don’t flatten out the bow and place it over the glue dot you just put on the back of the bow covering up the glue dot and then trim the ribbon close to the glue dot.


- Add the Bow to your card and it is ready to send to your favorite hero.


We’d love to hear your comments at Bowdabra blog!