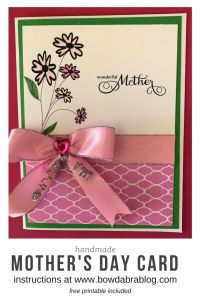
Mom’s always love their children’s artwork—no matter the age of the child. This handmade Mother’s Day card is easy to create and a joy to give and receive.
Supplies for the Mother’s Day Card
- Printable design for front of card
- 6½” x 5″ blank card
- 6¼” x 4¾” piece of contrasting cardstock
- ¼” Scor-Tape
- Hot glue and glue gun
- Mini Bowdabra
- Two 6″ lengths of 1″ satin ribbon
- One 9″ length of 1″ satin ribbon
- 12″ length of Bowdabra bow wire
Instructions for Making the Bow
- Cut ribbon to appropriate lengths. Dovetail the ends of one of the 6″ lengths. Quickly pass the ends through a flame to seal the ends.
- Fold the Bowdabra bow wire in half and place in the Mini Bowdabra. You can tuck the wire ends under the Mini Bowdabra so they are out of the way.
- Place the 6″ length of ribbon with the dovetail ends in the Bowdabra.
- Make a two loop bow with the 9″ length of ribbon. A) Place one end into the Mini Bowdabra. B) Bring the second end up and over, and place in the Mini Bowdabra. C) Press the center of the loop into the Mini Bowdabra.
- Compress the ribbon in the Mini Bowdabra with the Mini Bowdabra wand.
- With the ribbon still in the Mini Bowdabra, pass the ends of the bow wire through the loop, and tighten.
- Tie a secure knot on the reverse side of the bow.
- Bring the wire ends to top of the bow, and tie securely.
- Wrap one wire end around a skewer, pencil, or knitting needle to form a coil. Gently remove the skewer. Repeat with the remaining wire end.
Assembling the Mother’s Day Card
- Cut printable design to 6″ x 4½”.
- Attach the remaining 6″ length of ribbon to the printable card front design, wrapping the ribbon ends to the back of the printable and securing with Scor-Tape (or quick drying liquid adhesive).
- Place Scor-Tape on reverse side of printable.
- Mount the printable design to the contrasting cardstock.
- Mount to printable design and contrasting cardstock to the blank card front with Scor-Tape.
- Attach the bow to the front of the card with hot glue (or strong liquid adhesive).
- Optionally, embellish the center of the bow with a jewel.
Alternative Assembly for a Simpler Card
- Attach the remaining 6″ length of ribbon to the 6½” x 5″ printable card front design, wrapping the ribbon ends to the back of the printable and securing with Scor-Tape (or quick drying liquid adhesive).
- Mount to printable design to the blank card front with Scor-Tape.
- Attach the bow to the front of the card with hot glue (or strong liquid adhesive).
SaveSave
SaveSave