

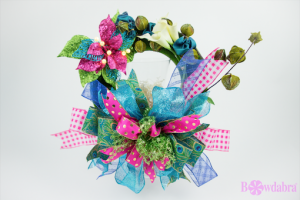
Watch this quick video DIY with Sandy Sandler and learn how to make the most beautiful lighted spring wreath.
Use small pieces of ribbon to make a large gorgeous wreath bow to add to your lighted spring wreath. This is a great way to use up those small pieces of ribbon.

Materials:
So now, we’re going to make this gorgeous lighted spring wreath with a big, beautiful wreath bow. So, let’s get started.
First, I’m going to start with a wreath that’s been kind of used and upcycled numerous times You won’t even going to notice it when we’re done.
Now, I’m going to take this beautiful pick, and I’m just going to put a little piece of glue here. Then, I’m going to just stick the pick into my wreath. And the glue will hold it in.
Then, I’m going to take these really cool lights and just turn them on so you can see what I’ve got here. Now, I’m going to just put this and tuck this underneath and just add the lights into my pick. These are our Bowdabra Pearl Lighted Stem which you can purchase in our Bowdabra store. We had a lot of requests for them when I used them before, so we decided to carry them in our Bowdabra store. They add a really nice touch to the lighted spring wreath. Here, I’ve just glued these stems on. And now, I’m going to put it aside and we’re going to make a gorgeous wreath bow.
So, let’s get started making our wreath bow by taking my Bowdabra Bow Wire, and I’m going to just fold this in half. Let’s see. Get it even. And I’m going to just lay it down into my Bowdabra, and I’m going to just tuck the ends underneath.
Just so you know, we’ve started by making a dovetail on all the tails that are going to go in. This wreath is going to have a lot of tails. (In order to dovetail, just in case you’re not familiar, we fold it in half, and we cut a diagonal from the fold to the end. And that gives us this great little dovetail.)
So now, all I’m going to do is fold this in half and scrunch it down into my Bowdabra. Then, I’m going to take the same ribbon and I’m going to just take the right side of the ribbon, put it upside-down into my Bowdabra. Next, I’m just going to loop this around and, take the right side of the ribbon and put it upside-down. Now, I’m going to just go to the center and scrunch this down into my Bowdabra. So, this way, the right side of the ribbon is on the outside of the loop. And that’s all we’re going to do for each one of these. We’re just going to build it in, and you’ll have the materials list that will give you everything that you need to build this.
Some people call this a Terry bow, and what we’re doing basically doing is just graduating the loops. So you can see how it’s kind of graduating in. When we are done, everything will get shaped out. So now, I’ll put these tails, fold it in half, and they go into my Bowdabra. So, it’s really, really simple. The right side of the ribbon goes down, and now, the right side is on the outside of my loop. And, this just goes down in here. There we go.
Next, I have this beautiful peacock ribbon. I’ll fold it in half. And all I’m going to do is just send these tails going that direction. Then I’ll scrunch that all down. Now, I’m going to take the right side of the ribbon, which goes upside-down into my Bowdabra. I’m going to fold it back around. And again, the right side of the ribbon goes upside-down. Then just bring it to the center and scrunch it in. So, this is really probably the easiest way that there is to make a Terry-type bow or a wreath bow. I’ve dovetailed the ends. I’m just going to take the center and scrunch that down.
Put the wrong side down, bring it back around, the wrong side down. Go to the center and scrunch it all in. So now, I’m going to take my tails, put those in. I’ll bring this in here. Bring it around, the wrong side while right side goes upside-down. Scrunch that in. Take my loop and scrunch this in here. And take my wand so we can give everything a really good push.
So, I’m just going to take this ribbon here and put this down in here. And I’ve got two pieces cut here, and I just want to make sure that I graduate them in. So, I’m going to take the longer one, put the wrong side down and just come back around.
Bring the wrong side around, push that in. Bring the center down. And just to help out here, I’m going to take my wand. When the Bowdabra gets full, sometimes the towers go together, so I just want to really scrunch that in. And now, I’m going to take my next tail, scrunch this down in here. I’m going to make my next loop, right side down, right side down, and center down.
And now, I have my Bowdabra Green Mesh. Just lay the tail in there. Put that in. it doesn’t really matter, because this is the same on both sides. So, we just want to center that in there. Take my tails again and lay those in. I’ll Lay it here and make my loop. Then I bring it back around. So, you can see, this is so very simple to do. And I’m just going to take my wand and do one more really good push.
Then, what I’ve done is taken the Bowdabra Rhinestone Mesh Ribbon, and I’m just going to cut it, I cut it into two strips. I’m just going to lay this down in here. Put all four pieces in here, so there are just two rhinestones on each piece. Take my wand and push everything down so it stays in my Bowdabra.
To finish, I’m going to take my Bowdabra Bow Wire, bring it up here and pull the two ends through my slipknot. I hold it in the Bowdabra while I pull it really tight. Then, pull it out. I’m going to separate the ends and just tie a knot. And how super simple is this to do? I just love this bow, and it’s so, so easy to make in the Bowdabra. Finally, all we do is shape it. To do this, you keep bringing everything in opposite directions.
You have all these beautiful colors and mixing all different types of ribbon. So, I’m just going to tie it onto my wreath, and you have this gorgeous lighted spring wreath, home décor piece for anything that you like.
Please do me a favor and click the Subscribe button below, and also, like us at Bowdabra on Facebook.”


