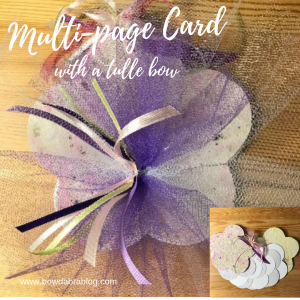
This multi-page card is perfect for those times when several people need to sign the card, or when you want to include more thoughts than a short sentiment. The addition of the beautiful tulle bow transforms the card into an elegant presentation piece.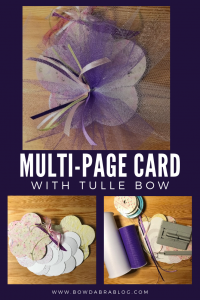

Supplies for the Multi-page Card and Tulle Bow

- 18″ length Bowdabra Bow Wire
- Mini Bowdabra Hair Bow Tool
- 24″ length 8″ wide white tulle
- 24″ length 6″ wide colored tulle
- 6″ to 8″ lengths of scrap ribbons in colors to compliment your card
- Page template
- Colored and patterned papers
- 1″ O ring
- Liquid adhesive
Instructions for Making the Multi-page Card and Tulle Bow
Making the Multi-page Card
- Cut scrap ribbons and tulle to appropriate lengths. Quickly pass the ribbon ends through a flame to seal.
- Use the page template to cut front and back covers from heavy cardstock.

- Using the page template cut several pages from coordinating colored and patterned papers.
- Glue pages to the front and back of each of the covers. Set aside to dry.
- When the adhesive is dry, assemble the multi-page card. Stack pages on top of the back cover aligning the small holes . Add the front cover on top of the stack of pages. Insert the O ring in the holes and close.

- Decorate the O ring by tying several pieces of scrap ribbon to it.


Making the Tulle Bow
- Cut scrap ribbons and tulle to appropriate lengths. Quickly pass the ribbon ends through a flame to seal.
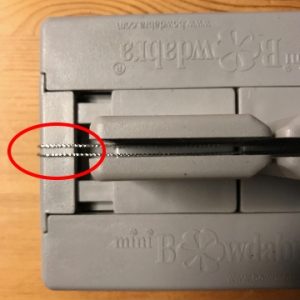
- Fold the bow wire in half and put in the Mini Bowdabra. Tuck the ends of the wire under the Mini Bowdabra to keep them out of the way.
- Scrunch the white tulle into the Mini Bowdabra.

- Scrunch the colored tulle into the Mini Bowdabra.

- Add five or six lengths of scrap ribbon to the Mini Bowdabra.
- Compress the ribbons with the Mini Bowdabra wand.

- With the ribbons still in the Mini Bowdabra, pass the wire ends through the loop and tighten.

- Remove the bow from the Mini Bowdabra, bring the wire ends to the back side of the bow, and tie a secure knot.

- Leave the wire ends long to tie the bow to the card.