


Hey everyone! I’m Simply Shalese, here to make something awesome with you guys! Today we will be making the most precious ornaments you’ve ever seen! These ornaments are adorable and easy to make! Let’s get started!
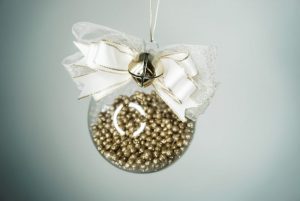
Clear Ornament
1 in wide sheer gold ribbon from LaRibbons – 11 inches long (3 pieces)
5/8 in wide gold trimmed ribbon from LaRibbons – 9 inches long (4 pieces)
Decorative Styrofoam Balls
Jingle Bell
Hot glue gun
Scissors
The first thing I do is fold my bow wire in half and place it in the center of the Bowdabra. I usually use about 18 inches or so. Make sure you have enough to tie the bow at the end.
Start with your wider ribbon, the 1-inch width ribbon. With the wrong side facing up, you are going to scrunch one end of the ribbon. I prefer to use a uniform scrunch. Fold the ribbon in half and bring the front and the back up and place it on the bowdabra. Make a loop and scrunch the other end of the ribbon. Estimate the center, scrunch it again and place it down
Repeat this step with all three pieces of the sheer ribbon. Use your wand to help scrunch everything together.
Take the 5/8 in width ribbon and repeat the same steps you just performed with the wider ribbon. I actually decided to cut on of the 9-inch-long pieces in half to make two 4 ½ inch long pieces. I also decided to ribbon cut the ends of the two smaller pieces. To ribbon cut, just fold the end in half with the fold at the top and the open ends at the bottom and cut at a diagonal. Then add the two tails to the bowdabra.
Next, add the other two longer pieces using the same steps you completed for the first piece. Use your wand to scrunch everything together. You are also able to adjust the bow as much as you’d like.
Give your bow one last scrunch and while the wand is in place you can adjust the bow as much as you’d like. Then remove the wand and bring the bow wire together. Bring the two open ends inside the looped end. While one hand is holding the bow in place, use the other hand to pull the bow wire taut. Then carefully remove the bow. Tie the bow wire in several knots.
Bring the bow wire to the front of the bow and tie it in another knot. Thread the bell through the knot and tie the bow wire into a knot a couple of times.
Open the top of your ornament and fill it with the decorative balls. You can use a funnel to help make this process easier. I used one bag and that fills the ornament about half way. You can use two bags if you want to completely fill the ornament. Also, you don’t have to use Styrofoam balls, you can use glitter, a photo or whatever you’d like. Just be creative!
I kept the bow wire long on the back of the bow so I could easily attach it to the ornament. Tie the bow to the neck of the ornament, or, you can tie it to the hook of the ornament. You could even cut the bow wire and just glue the bow to the ornament. I decided to tie the bow wire around the neck of the ornament. Cut away any excess bow wire. Add a small amount of hot glue for extra security.
Take another piece of bow wire and loop it through the top of the ornament. The length depends on how far you want your ornament to hand. I used about 5 inches of bow wire. Then tie it in a knot. You also have the option of buying ornament hooks and using those as well. Also, ribbon would be a good option. You can modify it to fit you! Just have fun with it and make it your own!
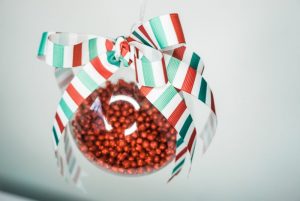
Clear Ornament
Decorative Styrofoam Balls
21 inches long (2 pieces) 5/8 in wide stripped ribbon from LaRibbons
18 inches long (2 pieces) 5/8 in wide stripped ribbon from LaRibbons
4 inches long (2 piece) 5/8 in wide stripped ribbon from LaRibbons
Hot glue gun
Scissors
The first thing I do is fold my bow wire in half and place it in the center of the Bowdabra. I usually use about 18 inches or so. Make sure you have enough to tie the bow at the end.
Since the ribbon will be hanging, I decided to ribbon cut the ends. To ribbon cut, fold the ribbon in half, with the open ends at the bottom and the fold at the top and cut at a diagonal. This step is optional. You can leave the ends squared off if you choose to do so.
Take one of your 21-inch-long pieces and fold it in half to find the center. With the wrong side facing up, scrunch the ribbon. I prefer a uniform scrunch which is folding the ribbon in half, place the front and the back up and scrunch it in the bowdabra. Make a loop with one side, using the measuring tool on the bowdabra to estimate the size of your loop. Scrunch the ribbon and place it down. Do the same thing with the other side. Use your wand to scrunch the ribbon together and make any necessary adjustments.
Repeat this step with the second 21-inch-long piece and also with the 18-inch-long piece.
Give your bow one last scrunch and while the wand is in place you can adjust the bow as much as you’d like. Then remove the wand and bring the bow wire together. Bring the two open ends inside the looped end. While one hand is holding the bow in place, use the other hand to pull the bow wire taut. Then carefully remove the bow. Tie the bow wire in several knots.
Take your 4-inch-long piece and tie it in a knot. Then place it in the center of your bow and hot glue it in place.
Open the top of your ornament and fill it with the decorative balls. You can use a funnel to help make this process easier. I used one bag and that fills the ornament about half way. You can use two bags if you want to completely fill the ornament. Also, you don’t have to use Styrofoam balls, you can use glitter, a photo or whatever you’d like. Just be creative!
I kept the bow wire long on the back of the bow so I could easily attach it to the ornament. Tie the bow to the neck of the ornament, or you can tie it to the hook of the ornament. Alternately, cut the bow wire and just glue the bow to the ornament. I decided to tie the bow wire around the neck of the ornament. Cut away any excess bow wire. Add a small amount of hot glue for extra security.
Take another piece of bow wire and loop it through the top of the ornament. The length depends on how far you want your ornament to hang. I used about 5 inches of bow wire. Then tie it in a knot. You also have the option of buying ornament hooks and using those as well. Also, ribbon would be a good option. You can modify it to fit you! Just have fun with it and make it your own!
Thanks for joining me! Be sure to check out and subscribe to my YouTube channel, Simply Shalese, for more awesome videos! Also, follow me on Instagram at SimplyShalese_diy! And check out Bowdabra Blog for more awesome videos!


