Hey everyone, I’m Simply Shalese, here to make something awesome with you guys! Today we will be making an adorable floral decorative Spring bow. Let’s get started!
Two inch wide floral burlap – 2 rolls
Two inch wide solid burlap – 2 rolls
Scissors
The first thing I do is fold the bow wire in half and place it in the center of the Bowdabra. I like to use a decent amount of wire, especially when I know I’m going to be tying the spring bow to something.
The next step is to cut your tails. I didn’t really measure the length. I just went with what I thought looks good to me, and I estimate it at about 20-25 inches or so. You can make the tails longer or shorter. It’s completely up to you. If you chose, you can skip this step altogether.
Once you have the amount of burlap you would like to use, fold the piece in half to find the center. Then scrunch in the center. Fold in half, bring the front and the back up and place it down. Repeat this step with the floral burlap. Use your wand to help scrunch it together.
For this step, I prefer to leave the burlap on the roll. I’m going to take my solid burlap and scrunch the end. Fold it in half, bring the front and the back up and scrunch it in the center of the Bowdabra. Make a loop and scrunch the burlap once again. The size of the loops on your spring bow are completely up to you. For a larger bow, make the loops larger. For the smaller bow, make the loop smaller. Make two loops with the solid burlap. Then repeat this step with the floral burlap.
For the floral burlap, make sure you start with the wrong side facing up. Make a loop and scrunch the burlap. An additional step for the floral burlap is to twist the burlap before you place it on the Bowdabra. After making two loops, switch back to the solid burlap. Keep repeating this step until you have used the entire roll or until you get the desired size.
Once you’ve added your loops, give it now final scrunch. Then take the bow wire, the two open ends inside of the loop. Hold the bow in place and give it a nice tug. Then remove it from the Bowdabra. Tie it in a knot a few more times. Next, you can cut away the excess bow wire but I like to keep it in place to help easily facilitate the tying of the bow.
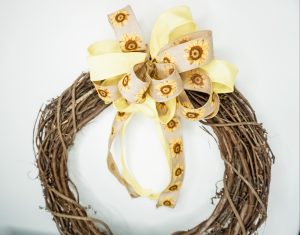
Then, you can just adjust and maneuver the loops to make them nice and round. If you’re using a ribbon that isn’t wire-edged, it will be a little more difficult to maneuver. You can ribbon cut the tails if you chose to do so. Also, you can gently rub your fingers along the tails to help curve them slightly. And you are all done! You have a beautiful floral spring bow you can use in a multitude of ways!

Thanks for joining me. Be sure to check out and subscribe to my youtube channel, Simply Shalese, for more awesome videos. Also, follow me on Instagram at SimplyShalese_diy And check out Bowdabra blog as well!