Have you ever noticed that it’s really hard to find just the right topper for your Christmas tree? Tree topper bows are usually a beautiful statement piece for those lush, tall Christmas trees. Today we’re going to share with you how to add the perfect bow to the top of your Christmas tree. Bowdabra ribbons are available in a wide variety of colors and styles, making it easy to customize your tree topper to your home’s unique style.
In this tutorial, we’re showing you some amazing Tree Topper, DIY bow, and wreath-making techniques using bow-making tools. Watch this Facebook Live as Nick from Nick’s Seasonal Décor teaches how to make gorgeous DIY tree topper bows & wreaths. Follow the step-by-step instructions and let’s get started!

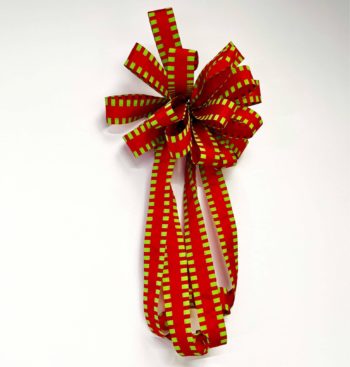
DIY Funky Bow (Starts at 1:27)
Materials Required:
- 100-Yard Bowdabra Bow Wire
- Large Bowdabra
- 7/8” Orange Ribbon Roll


DIY Funky Bow
Process:
- Nick folds the bow wire in half and tucks it underneath the Bowdabra.
- He cuts off a bunch of tails (11) about 24”-28” long from the ribbon roll.
- Next, he takes those pieces of ribbons, creates loops about 3 ½”, and places them one by one in opposite direction.
- He pulls the bow wire from one end to the other and ties the bow.
- He finishes off by fluffing the loops and cutting the dovetail pattern on the tail ends.
DIY Traditional Bow (Starts at 9:00)
Materials Required:
- 100-Yard Bowdabra Bow Wire
- Large Bowdabra
- Swiss Dot Ribbon Roll

DIY Traditional Bow
Process:
- Nick folds the bow wire in half and tucks it underneath the Bowdabra.
- After cutting off the tails from the swiss dot ribbon roll, he places them right into the Bowdabra.
- He takes the ribbon, flips it inside out, places it on the Bowdabra, and creates 11 loops.
- He pulls the bow wire from one end to the other and ties the bow.
- He finishes off by fluffing the loops.
DIY Bow Wreath (Starts at 12:50)
Materials required:
- 100-yard Bowdabra bow wire
- Large Bowdabra
- Burlap Ribbon Roll
- 14” Grapevine Wreath
- Yellow Daisy Stem with Leaves Sprays/Picks
- Filler Flower Sprays (Yellow)
- Hot Glue

DIY Bow Wreath
Process:
- Nick folds the bow wire in half and tucks it underneath the Bowdabra.
- After cutting off the tails from the burlap ribbon roll, he places them right into the Bowdabra.
- He takes the ribbon, flips it inside out, places it on the Bowdabra, and creates 4 loops (4 ½”).
- Using the same ribbon, he creates 2 comparatively smaller loops (3 ½”) and 1 button loop.
- He secures the bow with several wire knots in the back and finishes off by fluffing the loops.
- In the end, he sticks the bow securely to the wreath and adds some yellow daisy stems with leaves sprays and filler flower sprays with hot glue.
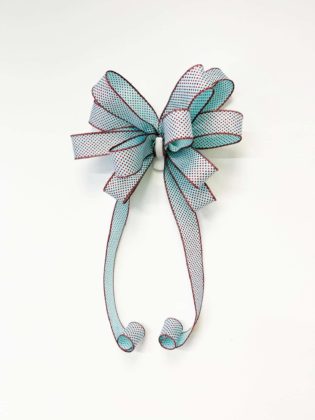
DIY Tree Topper Bow (Starts at 20:46)
Materials Required:
- Pipe Cleaners (2)
- Large Bowdabra
- Lime Green-Red Ribbon Roll

DIY Tree Topper Bow
Process:
- Nick twists both the pipe cleaners tightly and tucks them underneath the Bowdabra.
- After cutting off the 3 long tails from the ribbon roll, he places them right into the Bowdabra.
- He takes the ribbon, flips it inside out, places it on the Bowdabra, and creates 16-17 loops about 8” – 10”.
- He secures the bow with several wire knots in the back and finishes off by fluffing the loops.
Use this tree topper bow design and add that wow factor to your tree to really shine without going overboard!


How to Make a Tree Topper Bow – Bowdabra Tutorial
Please join us on Mondays at 4:00 p.m. PST, 5:00 p.m. MST, 6:00 p.m. CST, and 7:00 p.m. EST each week for another fun Facebook live.
Did you miss any Facebook lives? You can find DIY decor bows and more at the Bowdabra blog!