

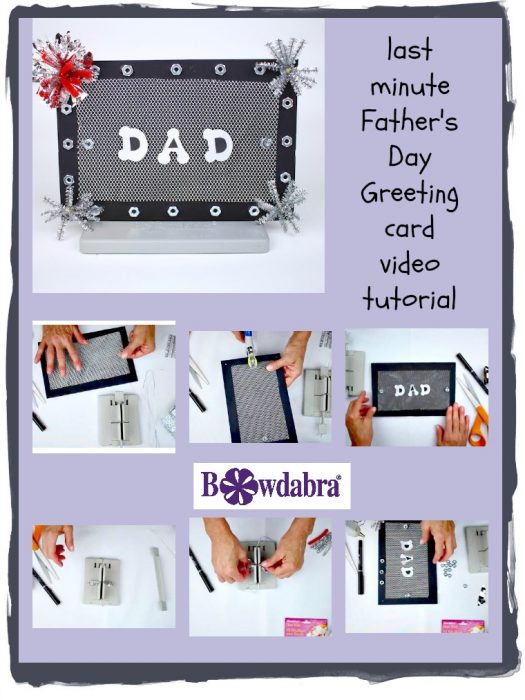
Looking for something quick and easy to make for Dad this Father’s Day? Watch this video tutorial as Bowdabra creator Sandy Sandler shows you how to make a last minute greeting card perfect for Father’s Day.
The kids will enjoy helping to glue on the hardware nuts as a final touch for this last minute greeting card. Dad is sure to cherish this handmade treasure for years to come!

Now we’re going to make a wonderful last minute greeting card for Father’s Day, or just a gift for Dad. And basically, we start with a piece of card stock, folded in half. I’m going to just set this aside for a second. Then what I’m going to do is take my stencil, which you can see are quite well used, and turn them upside down. This technique is a trick that I learned from a friend. If you do the stencil upside down, when you go to cut it out and don’t cut it perfectly you won’t see your lines.
So, we are going to stencil Dad — whoops! See, that’s exactly why we do it upside down. And now I will cut out my stencil. Okay. So, now we have our D, and I’m just going to put that aside. And I’ve already cut out my other D and my A.
So, the next step that I’m going to do is I’m going to take the lettering, and I’m going to cut a really small triangle, off of this card stock. And I’m going to just take a little dab of glue here, and I’m going to just glue my little A here. On the back, I have a piece of sticky foam, because that’s going to give it a little height. I’m going to just stick that, when I get time — when I get to that step, I’m going to stick the lettering onto my card.
But the first thing that I’m going to do, well I’ve actually started, is attach this mesh, that comes in a 12 x 12 mesh which you can buy it on Amazon. And we have a link to where you can get it below. It’s really cool, because it’s metallic.
Then the next step that I’m going to do is I’m going to take the snap tool — it’s for attaching snaps. I’m going to do is put it into the center here, and snap a hole. And then I’m just going to have to kind of pull it out there.
We went to the hardware store and we bought a bunch of bolts, I mean nuts, not bolts. And what I did was I just took a piece of a chenille stem and put it through the bolt, and twisted it. And I’m just going to stick that through my hole. So this is what is going to hold the bolts and also hold the metallic card stock. And then I just go to the back and I’m just going to fold that over. And that’s going to hold everything down.
So, now that I finished that, this is where we take our lettering, and take the backs off here. And we just go ahead and stick our D, and then my A. I already took the backing off that. And then add my other D. Next, we’re just going to stick this, I think, there we go. And just peel this off here. And now we have Dad.
Now, the next step we’re going to do is I’m going to put this aside and we’re going to make a bow. And I’m going to make the bows in my Mini Bowdabra. I’m using my silver bow wire, which you can get it in either these packs of 50 feet, or 100-yard rolls. I’m going to just fold my Bowdabra Bow Wire in half and lay that down into the Bowdabra. Then I tuck the ends under here to keep it out of the way.
I’m going to just take my chenille stems, or pipe cleaners if you want to be old-fashioned about it, and I’m just going to put them all in here. I have about 5 of them there. And then now what I’m going to do because I folded the wire in half, I have the slip knot, I’m going to pull my wire through the slip knot. I pull it tight while it’s still in the Bowdabra and bring it around to the back and I’m just going to twist it.
And then I’m going to shape my bow. And once it’s shaped, what I’ve done here is I’m going to use my snap tool, and I’m just going to snap a little hole through here. Now if you don’t have a snap tool, you can use a hole punch, but I like the sizing that you get from this little snap tool.
So, I’m just going to feed my wire through here, and put that on there. And then I’m just going to take a little bit of glue from my hot glue gun and just glue that down. Then I’m just going to cut that piece. So, I’m going to kind of put that aside so I can let the glue dry for a second.
Now, I’m going to make my next bow. And again, I’m folding my Bowdabra Bow Wire in half and laying it down into the Mini Bowdabra. I tuck it under to keep it out of my way. What I’m going to do is I’m doing exactly the same thing with my little chenille stems, pipe cleaners, whatever you want to call them. And I’m just going to layer these in here. On top, I’m going to put a little red one to add some color.
Oh, whoops, you know what I forgot? Good for me. I have our Bowdabra Scrunchy Ribbon. I’m so excited to let you know that you can now buy that on our blog. What I’m going to do here is just cut a little piece. Because I want this bow to be a little bit smaller, I’m just going to cut about a third off of my scrunchy ribbon. And I’m not worried about how even it is or not. Let me just tuck these under here. The cool thing about Bowdabra is that it’s so easy, if you make a mistake, you just start over.
And I’m just going to scrunch this down into my Mini Bowdabra. And that’s why we call it our Scrunchy Ribbon, because it just scrunches. Now, I’m just going to lay this down in here, all my chenille stems, and I’m going to put my red one to add a little bit of color, and I’m just going to scrunch it all down. Then I’m going to pull it through a slipknot.
And these bows, I mean I’m using them for this card, but you can use them for so many other things. I bring it around to the back and tie it off. I think I twisted the last one. It doesn’t really matter with the Bow Wire. And I’m just going to kind of shape that, and shape my little bow here. And if you want to add a little dimension, you can just kind of cut the ends, just to make it a little spiky.
Next, I’m going to take my card back here. And this one, I’m going to put up in the top right-hand corner, I think. Feed that through, and feed this one through. And I’m going to wait to glue this one because I want to start showing you the next step.
To finish, I’m going to take some of our nuts, I think, if I can open the package. Okay. Goodness. There we go. And I’m just going to put a couple out to make it easier. I’m going to take my glue gun, and I’m just going to put little dabs of glue and glue these on, and just keep going. And just do it in a little pattern across. And I’m going to do the same thing along the sides. Through the magic of video, I already have this one finished. Isn’t this last minute greeting card for Dad awesome? What a great, quick gift to make for Dad?
If you loved this last minute greeting card for Father’s Day video be sure come back each week to Bowdabra blog for new craft tutorials, recipes, and video tutorials
Don’t forget to subscribe to our YouTube channel, and please like Bowdabra on Facebook.”


