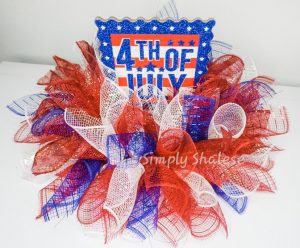
Hey everyone, I’m Simply Shalese, here to make something awesome with you guys! Today we will be making a Fourth of July Centerpiece. Let’s get started!
Small 8” Wire Wreath Ring
Red Deco Mesh 6” wide
White Deco Mesh 6” wide
Blue Deco Mesh 6” wide
Red glitter ribbon – 1.5 inch wide
Chenille Stems
Decorative sign
Hot glue gun
Scissors
Cute your deco mesh rolls into 8 inch long pieces. The exact amount of rolls you will need depends on how poofy you want your centerpiece. Cut your chenille stems in half. Also, cut the ribbon into 8 inch long pieces.
Place your half of a chenille stem in the center of your Bowdabra. Next, take your first piece of mesh and there are two ways you can roll your mesh. You can roll it in a cute little curl or you can roll the mesh at a diagonal. I chose to go with the diagonal roll this time. Scrunch your mesh in the center and place it on the Bowdabra. Repeat this step with the other two colors.
Use your wand to scrunch everything together. Criss-cross your chenille stem and twist it nice and tight. And tuck it away. Repeat this step for as many bundles as you’d like. I prefer to alternate the colors because it makes for a a more colorful and fun looking centerpiece. I’m also going to add ribbon to a few of the bundles.
Once you have all the bundles together, it’s time to start placing them on the ring. There are several ways to place the bundles. You can place them all on the outer two rings or place them all on the inner two rings. You can also alternate between the inner two and outer two rings. I prefer to alternate because I feel it gives you the best looking centerpiece but go with whichever way works best for you.
Twist the stem over the rings and twist the ends then tuck them away. Repeat this step all the way around the ring.
You can use any type of sign or center decor you chose. I decided to go with this 3 piece sign but I’m going to separate the sign. Take two chenille stems and twist them together to make one long chenille stem. Use your hot glue gun to glue them all in place. Then glue the first sign to the back of the second sign. You could glue all three signs tougher in the shape of a triangle if you chose to do so.
Once that is complete, you can add your sign to the centerpiece. Push the mesh aside to where you can see the ring and twist the chenille stem around the rings. Then replace the mesh so the stems aren’t visible. Repeat this step with the other side.
And you are all done. I placed 7 bundles in each of the 3 sections for a total of 21 bundles and I have 3 pieces of mesh in each of my bundles. The amount of mesh you use just depends on how large and poofy you want your centerpiece. You can add whatever embellishments you’d like. Just have fun with it and make it your own.

Thanks for joining me. Be sure to check out and subscribe to my youtube channel, Simply Shalese DIY, for more awesome videos. Also, follow me on Instagram at SimplyShalese_diy And check out Bowdabra blog as well!