Hey everyone, I’m Simply Shalese, here to make something awesome with you guys! Today we will be creating awesome gift wrap ideas. Let’s get started!
A gift
Wrapping paper
White balloon ribbon
grey ribbon 1 inch in width
Bow wire
Scissors
Double sided tape
Use your wrapping paper to completely cover the gift. Cut away any excess wrapping paper so that your gift is nice and smooth and not bulky. Use double sided tape to tape your wrapping paper to your gift. Fold in your corners and crease them. Then bring the top and bottom down and tape in place. Repeat this step on the other side.
The first thing I do is fold the bow wire in half and place it in the center of the bowdabra. I like to use about 8-9 inches of bow wire.
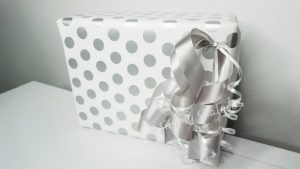
This ribbon is simple to use because it curls by itself so that makes for a really cute and curly bow. Start with your thicker ribbon, cut a couple of pieces. The size of the pieces are completely up to you. Then fold in half to find the center and scrunch. Use a uniform scrunch by folding the ribbon in half, bring the front and the back up and place it in the center of the bowdabra. Repeat this step with a second piece. You can use as many or as few pieces as you’d like.
Now it’s time to add your thinner balloon ribbon. It isn’t as curly as I would like for it to be. There is a way to fix that. Take your scissors and you’re going to pull them along the ribbon. The firmer you press, the curlier your ribbon is going to be. So adjust your pressure to the desired curliness. You can practice on a spare piece of ribbon if you’d like.
Once you’ve curled your pieces, you can start placing them on the bowdabra. You do have the option of placing your ribbon and then curling once all of your ribbon is in place. Either way works just fine.
Once you have as many pieces as you desire, scrunch the ribbon with the wand.
Give your bow one final scrunch. Then take the bow wire, the two open ends inside of the loop. Hold the bow in place and give it a nice tug. Then remove it from the Bowdabra. Tie it in a knot a few more times just to make sure it’s nice and secure. Cut away the excess bow wire
You have the option of adding a center to your bow, especially if your bow wire doesn’t match your color scheme.
You can place the bow wherever you’d like, left, right, top. Since it is so cute and curly, I definitely want to make sure it’s hanging. Once you pick a place, you can take a small amount of glue and hot glue the bow in place. or you can use more bow wire and attach it to the gift so you don’t have to use glue. Either way works just fine.
Gift
Wrapping paper
Glitter tulle
Scissors
Bow wire
Check out this video on how to use a cool hack to quickly and efficiently wrap a gift.
The first thing I do is fold the bow wire in half and place it in the center of the bowdabra. I like to use about 8-9 inches of bow wire.
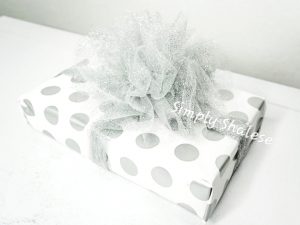
I have cut the tulle into 10 inch long pieces. I have about 6 pieces. The number of pieces just depends on how fluffy and poofy you want your bow. Start with your first piece of tulle and just carefully thread it through onto the bowdabra. I prefer to place one piece at at time but you can definitely use two. Once you have your tulle in place, use your wand to scrunch it all together. Fluff it up really nice.
Give your bow one final scrunch. Then take the bow wire, the two open ends inside of the loop. Hold the bow in place and give it a nice tug. Then remove it from the Bowdabra. Tie it in a knot a few more times just to make sure it’s nice and secure. Cut away the excess bow wire
Take your glitter roll and wrap it around your gift, criss cross and come back around to the front. Then tie it in a knot. Place the bow in the center and use the tulle to tie it to the gift. This makes it possible to reuse next year. Cut away any excess tulle and fluff once again.

Thanks for joining me. Be sure to check out and subscribe to my youtube channel, Simply Shalese DIY, for more awesome videos. Also, follow me on Instagram, Pinterest and Facebook! And check out Bowdabra blog as well!